Are you tired of manually saving your important files to an external hard drive? Or perhaps you’ve experienced the frustration of losing your files due to a computer crash or virus attack. Fear not, my friends! Windows has got you covered with its built-in backup tool: File History. In this step-by-step guide, I’ll walk you through how to use File History to protect your valuable data.
First, we’ll dive into understanding the different Windows backup tools available to you. Once you’ve got a handle on that, we’ll move on to preparing for backup. This includes deciding which files to save, and ensuring your external hard drive is ready to go.
Next, it’s on to setting up File History. Don’t worry, it’s a simple process! We’ll cover every detail, even how to customize your backup settings.
But it doesn’t stop there! We’ll also explore managing your backup storage and restoring files from backup. And for those who are feeling confident in their backup skills, we’ve even included advanced backup options – because there’s always room for improvement.
So, grab your notepad and let’s get started on simplifying your backup process with File History!
Understanding windows backup tools
Before getting started with Windows backup tools, it’s important to understand what they are and how they work. Backup tools are software applications designed to create a copy of your important files and data so that you can restore them in case of loss or corruption.
Windows provides users with a variety of backup tools, including File History, System Image Backup, and Backup and Restore. Each tool is designed for a specific purpose and can be customized to meet your backup needs.
In order to fully utilize these backup tools, it’s important to prepare your system for backup. This includes organizing your files and identifying which files are the most important for backup.
Once you’ve prepared your system, you can move on to setting up File History, which is a simple and effective backup tool that automatically backs up your files to an external hard drive or network location.
Customizing backup settings allows you to control how often files are backed up and which files are included in the backup. Managing backup storage ensures that you have enough space to store your backups, while restoring files from backup is simple and straightforward when you need it.
For those who want to take their backup strategy to the next level, advanced backup options such as System Image Backup and Backup and Restore provide additional customization options and the ability to create a complete backup of your entire system.
By understanding the various Windows backup tools and how they work, you can ensure that your important files and data are protected and easily accessible in the event of a system failure or other data loss scenario.
Preparing for backup
Before diving into setting up Windows backup tools, it’s important to prepare your computer for the backup process to ensure it goes smoothly.
Firstly, determine what types of files you want to back up. You might want to consider backing up essential documents, family pictures or other personal files, music, or videos. Additionally, if you have any applications that are important to you and have settings that you don’t want to lose, it may be wise to back up their data as well.
Once you’ve decided what to back up, ensure you have enough storage space available. You can either use an external hard drive or a cloud-based storage service, depending on your preference. It’s important to have enough space to store your backups as well as any future backups you may need to create.
Before setting up backups, ensure your computer is updated with the latest version of Windows. Check for updates and install them to ensure that you have a stable and secure environment in which to store your backup files.
It’s also important to consider the frequency at which you want to run backups. Depending on your usage, you might want to back up your files daily, weekly, or monthly. Be sure to select a backup frequency that meets your needs and create a schedule that works for you.
By taking these steps to prepare your computer for backup, you’ll be able to create a stable and reliable system for keeping your files safe and secure. In the next section, we’ll delve into setting up File History, one of the Windows Backup tools available for use.
Setting up file history
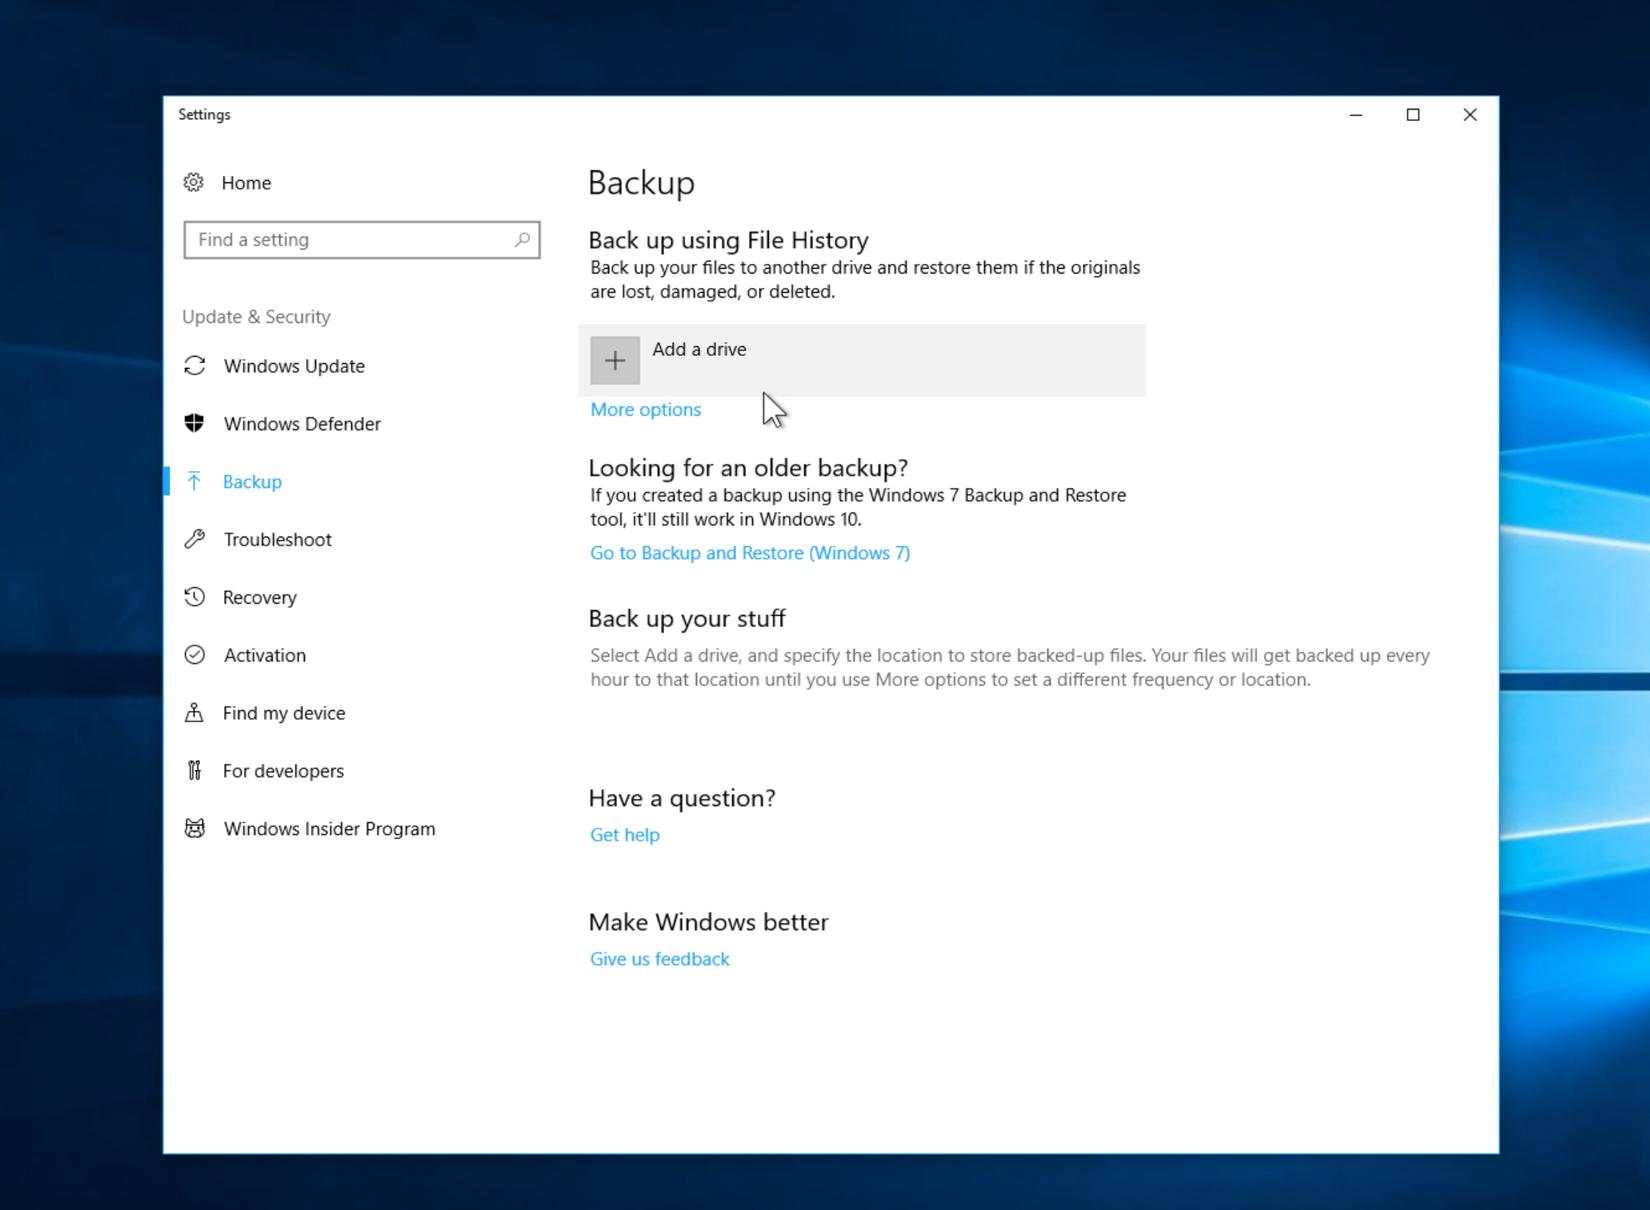
File deletion or corruption is a common problem, which is why having a backup solution in place is always recommended. One of the easiest ways to backup your files in Windows is by using File History. Here’s how you can set up File History on your Windows PC:
- Go to Settings by pressing Windows + I on your keyboard.
- Click on Update & Security, and then select Backup from the sidebar.
- Click on Add a drive under the Backup using File History section and choose a drive where you want to store your backup files.
- Once you have selected the drive, toggle the switch to turn on File History.
- By default, File History will backup all the files in your user folder. If you want to add or remove folders from the backup list, click on More options and then select Add a folder or Remove.
- You can also change the frequency of the backup by clicking on Back up my files and selecting a time interval.
And that’s it! Your files will now be backed up automatically by File History. In the next section, we’ll show you how to customize the backup settings to suit your needs.
Customizing backup settings
Customizing backup settings is an important step to ensure that your files are backed up in the most effective and efficient way possible. By modifying the backup settings, you can choose which folders are backed up, how often backups occur, and how long backups are kept.
One important customization option to consider is the selection of backup frequency. This allows you to choose how often your backups will occur. You may want to set your backups to occur daily or weekly, depending on how frequently you make changes to your files.
Another customization option is the selection of backup retention. This ensures that older backups are replaced by newer ones. You can set the retention period for backups, so they are kept for a certain number of days, weeks, or months.
It’s also important to consider which folders are included in your backup. By default, File History backs up your user folder, but you can choose to exclude certain files or folders that you don’t need to backup.
Overall, customizing your backup settings is crucial to ensure your backups are tailored to your specific needs. In the next section, we’ll discuss how to manage your backup storage to prevent storage issues.
Managing backup storage
After you have set up your file history backup and run regular backups, it’s important to manage your backup storage. Otherwise, the backup drive will eventually get full, and the file history will stop backing up new files.
Windows Backup provides several easy ways to manage backup storage. First, you can view your backup settings and storage usage by opening the settings app, selecting “Update & Security,” and then clicking “Backup.” There, you can see details about your backup drive, including how much space is used and how much is free.
If your backup drive is running low on space, you can delete older backups to free up space. Simply go to the “Backup Options” section in the Backup settings and click on “Advanced Options.” Here you can select “Clean up versions,” which allows you to delete older versions of files that you no longer need.
Another option for managing backup storage is to change the size of the backup cache. The backup cache is a temporary storage location where file history keeps a copy of recently changed files before copying them to the backup drive. By default, the cache is set to 20% of the available space on the backup drive. If you have a small backup drive, you might want to reduce this percentage to free up space.
Managing backup storage is a simple yet essential task that ensures that your backup system works efficiently without running out of space.
Restoring files from backup
It’s happened to the best of us – a sudden glitch, a system error or accidental deletion and all of a sudden, an important file is lost. Thankfully, if you’ve set up Windows File History, restoring files from backup is a breeze.
Simply open the File History app and click on the “Restore files from a current backup” option. This will bring up a window displaying all your backed-up files. You can either select the specific file you want to restore or navigate to the relevant folder and choose the file.
Once you’ve selected the file, click on the green “Restore” button and sit back while Windows restores the file to its original location. If you want, you can also choose to restore the file to a different location by selecting the “Restore to” option before clicking the “Restore” button.
It’s important to note, however, that File History only backs up files in specific locations by default. If you’ve saved a file in a location that isn’t included in your backup settings, it won’t be backed up and won’t be available for restore. To ensure you don’t lose any important files, make sure to customize your backup settings and include all necessary file locations.
Remember, having a backup is essential to ensuring you never lose important files. With Windows File History, restoring files from backup has never been easier.
Advanced backup options
Whilst File History offers a great way to keep your files backed up and provides comprehensive backup features, there are a few advanced backup options worth considering. These options allow you to fine-tune your backup strategy and can be particularly useful if you have important or valuable data that you want to protect.
Here are some advanced backup options you may want to consider:
- System Image Backup: This option allows you to create a snapshot of your entire system, including your operating system, installed software, settings, and files. This is a good option if you want to be able to restore your entire system quickly in the event of a serious issue.
- Offline Files: If you are using a laptop or a device that is not always connected to the network, Offline Files can be an essential tool. With this option, you can set up certain files or folders to be available offline, meaning you can access them even when you don’t have an internet connection.
- Shadow Copies: Shadow Copies allow you to recover previous versions of files. This is particularly useful if you accidentally make changes to a file and need to restore an earlier version.
Overall, the advanced backup options in Windows can help you to ensure that your data is well-protected and can be restored quickly in the event of an issue. However, it is important to remember that creating backups is only one part of a comprehensive data protection strategy. You should also ensure that you have appropriate security measures in place, such as firewalls and antivirus software, to protect your data from cyber threats.
Conclusion
Congratulations, you have completed the step-by-step guide to Windows Backup Made Easy with File History! It can be a daunting task to ensure that all your important files and data are safe and secure, but with File History, you can rest easy knowing that you have a reliable backup system in place.
Understanding the Windows Backup tools and preparing for backup are crucial aspects of the process. Setting up File History is straightforward, and you can easily customize the backup settings to fit your specific needs. Managing backup storage is another essential feature that you can adjust at any time.
In the event of any data loss, restoring files from the backup is simple and straightforward. You can even explore advanced backup options to further tailor your backup system to your needs.
Remember, backing up your files is a vital habit to prevent unexpected data loss, and with File History, it’s easier than ever. So, don’t wait any longer; start backing up your data today!
